HTML is Hypertext Markup Language. It provides the basic text that would display on the webpage. You can only edit the text style that's shown on the site. More advanced editing will use CSS for additional display or location formats.
HTML consists of a series of elements and the elements are represented by tags. Each tag with a closing tag is essentially is an element. Inline elements do not start on a new line; they take only the necessary width. Block elements will start on a new line and take the full width available.
Block Level: <div>, <h1> - <h6>, <p>, <form>
Inline level: <span>, <img>, <a>
To open a page in a new tab use target = "_blank". Generally used for external sites
HTML tag syntax format is generally set up as <tagname> attributename="attributevalue">content</tagname>
Attributes
Attributes go inside opening tags. They could be global attributes like class & id. Class attribute lets us style elements with CSS or selectors with JavaScript.
'src' - image source or directory
'width' or 'height' defines the image size in pixels or relative to percentage
'alt' - provides alternate text for an image when it cannot be displayed properly for some reason
'style' - add styles to the element such as color, font, or size.
'lang' - located inside the <html> tag, it declares what language the webpage uses. Ex: <html lang="en-US">
'title' - value of the attribute will be displayed as a tooltip when hovering mouse over the element. Ex: <h2 title="this is a header!">TitleBlock</h2> This will display 'TitleBlock' and will display 'this is a header' in small text only when you hover over it with the mouse.
All tags can have attributes, they provide informatioon about an element. They can have 'key' or value pairs or ID tags. (id="someID")
Miscellaneous Display Tips
For special characters that would trigger code and not display properly, you would use the '&' symbol followed for the character code. For example, to display & symbol you would use '&'. For the '<' you would use '<' and the for '<' symbol, you would use '>'.
Inserting Tabs or Spaces
- perceived to be twice the space of a normal space in a line that cannot be broken by a word wrap. Displays as: ' '
  - perceived to also be twice the space of a normal space. Displays as: ' '
  - percieved to be four times the space of a normal space. Displays as: ' '
Lorem ipsum in visual studio will automatically fill it, or lorem10 for 10 words to test it.
Text Formatting
Text formatting elements were designed to display special types of text.
<b> - bold Bold Text Example
<strong> - important text Strong Text Example
<i> - italic Italic Text Example
<em> - emphasized text; displays like italic Emphasized Text Example
<mark> - marked text / highlighted Marked Text Example
<small> - smaller text Small Text Example
<del> - deleted text / line goes through text Deleted Text Example
<ins> - inserted text / underlined text Inserted Text Example
<sub> - subscript text; Subscript text can be used for chemical formulas, like H2O: Example: CO2
<sup> - superscript text; like squared formula or footnotes. Text Example[2]
Block Quote, Abbreviations, Citing
Quotation and Citation Elements - <blockquote>,<q>, <abbr>, <address>, <cite>, and <bdo>
<blockquote> tag defines a section that is quoted from another source. It’s usually indented. Example:
					<blockquote cite="https://en.wikipedia.org/wiki/Lorem_ipsum">
					Lorem ipsum dolor sit amet, consectetur adipiscing elit, sed do eiusmod tempor incididunt ut labore et dolore magna aliqua. Ut enim ad minim veniam, quis nostrud exercitation ullamco laboris nisi ut aliquip ex ea commodo consequat. Duis aute irure dolor in reprehenderit in voluptate velit esse cillum dolore eu fugiat nulla pariatur. Excepteur sint occaecat cupidatat non proident, sunt in culpa qui officia deserunt mollit anim id est laborum.
					</blockquote>
Which displays the following:
Lorem ipsum dolor sit amet, consectetur adipiscing elit, sed do eiusmod tempor incididunt ut labore et dolore magna aliqua. Ut enim ad minim veniam, quis nostrud exercitation ullamco laboris nisi ut aliquip ex ea commodo consequat. Duis aute irure dolor in reprehenderit in voluptate velit esse cillum dolore eu fugiat nulla pariatur. Excepteur sint occaecat cupidatat non proident, sunt in culpa qui officia deserunt mollit anim id est laborum.
<q> tag defines short quotes. Browsers add quotation marks around the quote. Browsers usually insert quotation marks around the q element. Example:
<p>The most common webdeveloper phrase on youtube videos: <q>I have no idea what I'm doing...</q></p>
Which displays the following:
The most common webdeveloper phrase on youtube videos: I have no idea what I'm doing...
<abbr> tag defines abbreviation or acronyms like "HTML", "CSS", "WHO", "OSHA", "CDC".
<p>The <abbr title="Centers for Disease Control and Prevention">CDC</abbr> was founded on July 1, 1946.</p>
Which displays the following:
The CDC was founded on July 1, 1946.
<address> defines the contact information for author/owner of document or article. The text in the element usually renders in italic and browsers will always add a line break before the tag. The contact information can be an email address, URL, physical address, phone number, social media handle, etc.
Address Tag Example:
					<address>Written by Dr. John Watson
					<br>Visit us at: https://en.wikipedia.org/wiki/221B_Baker_Street
					<br>221B Baker Street,
					<br>London, UK
					</address>
Which displays the following:
Written by Dr. John Watson Visit us at: https://en.wikipedia.org/wiki/221B_Baker_Street 221B Baker Street, London, UK
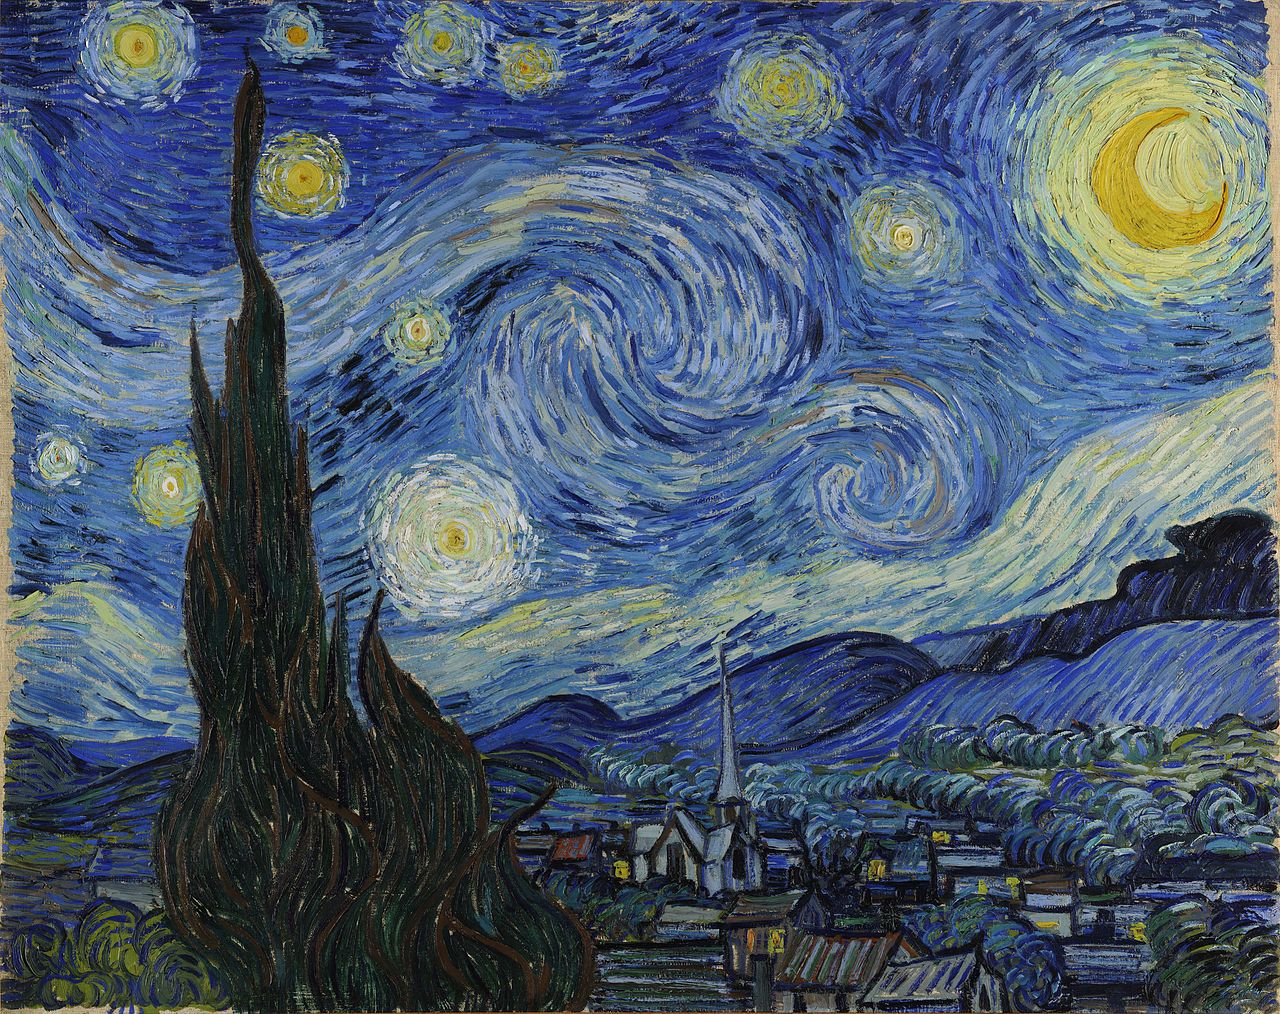
<cite>tag defines the title of creative work.
Following us an example of using a cite tag:
					<img src="https://www.vangoghgallery.com/img/starry_night_full.jpg" width="300" alt="Starry Night">
					<p><cite>Starry Night</cite> by Vincent van Gogh. Painted in 1889.</p>
Which displays the following:
Starry Night by Vincent van Gogh. Painted in 1889.
<bdo> is used to override the current text direction: BDO stands for Bi-Directional Override.
Example:
<bdo dir="rtl">This text will be written from right to left</bdo>
Which displays the following:
Text will go from right to left.
Images
The <img> tag is used to insert images. Images are self closing and do not require a closing tag. They always include a 'src' or source attribute to define where the image directory is located.
The file path is case sensitive, so if there is a typo then the image will show the alt text. Src attributes can go to either another website/absolute URL or relative URL. Relative URLs are better so they will not break if you change domains.
The 'alt' attribute will provides alternate text for an image when it cannot be displayed properly.
The following is an example of using the image tag:
The <a> tag is used to create hyperlinks. When you have the directory for the image as a the hyperlink, it essentially functions like viewing the image from your web browser.
Images are not technically inserted into a web page but are linked to web pages. The <img> tag creates a holding space for the referenced image. HTML allows animated gifs
List items are items using the <li> tag. They are enclosed in either the <ul> or <ol> tag
<ul> tag represents Unordered Lists and they're generally used in the navigation bar that are styled to flow to the right and displayed in line.
By default, the list item tags are set as a block. These lists items are displayed with disc bullet points but you can edit it in the style sheet by editing the 'list-style-type: disc;' attribute.
On the other hand, when using the <ol> tag or ordered lists will show bullets as numbers.
Creating Tables
Generated by using the <table> element tag.
Enclosed in the tag is the <thead> tag the which represents the heading row which includes all of the column names. You need to create the <tr> tag which is represented by table row followed by <th> tag to display column names.
Like the rest of HTML, the <body> tag follows the <head> tag. Tables use the <tbody> element tag. Instead of using <tr> tag, the <tbody> tag utilizes <td> tag for table data.
In order you create additional rows, you would just use another line with the <td> tag nested in between the table row <tr> tag.
You can create forms on HTML, however you cannot add functions to it. You can build the actual output display however it requires another language with dynamic functionality to store or use the data. Usually with a form, it will have an attribute called action that references another file to submit the form to another page like a news form or register form followed by a post method.
Methods are generally requests to a server using POST action which adds data to a database without displaying the data submitted in the URL as opposed to the GET action that does display it in the URL. The GET action is usually used by search functions where you do not enter any data to a server.
The <label> tag is used to create a label that doesn't have any fields to insert data. You would generally use the <input> tag to create a field. Both <label> and <input> tags are both inline by default. In order to separate them, you would use the <div> tag to put each field into it's own block.
Below is an example of a simple table.
Form Example
Below is an example of some basic form options
The form is generated using the following HTML5 code:
			<form action="process.css" method="POST">
				<div>
					<label>First Name:</label>
					<input type="text" name="firstName" placeholder="Enter first name">
				</div>
				<div>
					<label>Last Name:</label>
					<input type="text" name="lastName" placeholder="Enter last name">
				</div>
				<div>
					<label>Email:</label>
					<input type="email" name="emailAddress">
				</div>
				<div>
					<label>Birthday:</label>
					<input type="date" name="birthday>
				</div>
				<div>
					<label>Quantity</label>
					<input type="number" name="quantity" value="1">
				</div>
				<div>
					<label>Topic:</label>
					<select name ="emailTopic">
						<option value ="newOrder">New Order</option>
						<option value ="customerService">General Customer Service</option>
						<option value ="productSupport">Order Support</option>
						<option value ="suggestiions">Suggestions</option>
						<option value ="other">Other</option>
					</select>
				</div>
				<div>
					<label>Message:</label>
					<textarea name="message"></textarea>
				</div>
				<input type="submit" name="submit" value="Submit">
			</form>
The type input attribute in the example defines what type of data is being submitted. There are various type attributes:
"text" attribute" allows text values too be entered.
"email" attribute will check if the email address is valid and display an error alert if it isn't.
"date" attribute only allows date entries or brings up a calendar to select dates
"number" attribute only allows number values to be entered
The name input attribute is meant for serverside programming and the attribute is how we would call the value from the form.
The <textarea> tag with the name textarea attribute is used to create the message field where you can click and drag the corner to edit the size of the text box.
The "value" input attribute displays black text in the field. Use the "placeholder" input attribute instead in order to display faded gray text.
**The <input type="submit name="submit" value="Submit"> before the </form> closing tag creates a button that submits the form to a process the action defined in the form tag.
Buttons
<Button> tags are just as the tag name implies, they create a button but function but to have to be added using javascript or other functions
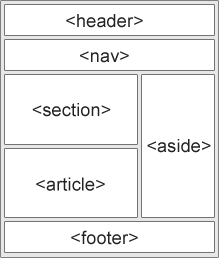
HTML5 Semantic Tags
A semantic element clearly describes it's meaning to both the developer and the browser. Generally used to lay out your website.
<header> tags include your logo and social media links
<footer> tags are generally for your copyright or privacy policy links
<aside> side bar content.
<main>
<article> generally used for blogs and you can have an article tag around each post.
<nav> as the tag implies is meant for your navigation bar.
<section> the copy text that's generally displayed on your home page.
Each article that goes here will be a blog post. Lorem ipsum dolor sit amet, consectetur adipiscing elit, sed do eiusmod tempor incididunt ut labore et dolore magna aliqua. Ut enim ad minim veniam, quis nostrud exercitation ullamco laboris nisi ut aliquip ex ea commodo consequat. Duis aute irure dolor in reprehenderit in voluptate velit esse cillum dolore eu fugiat nulla pariatur. Excepteur sint occaecat cupidatat non proident, sunt in culpa qui officia deserunt mollit anim id est laborum.
Lorem ipsum dolor sit amet, consectetur adipiscing elit, sed do eiusmod tempor incididunt ut labore et dolore magna aliqua. Ut enim ad minim veniam, quis nostrud exercitation ullamco laboris nisi ut aliquip ex ea commodo consequat. Duis aute irure dolor in reprehenderit in voluptate velit esse cillum dolore eu fugiat nulla pariatur. Excepteur sint occaecat cupidatat non proident, sunt in culpa qui officia deserunt mollit anim id est laborum.
Lorem ipsum dolor sit amet, consectetur adipiscing elit, sed do eiusmod tempor incididunt ut labore et dolore magna aliqua. Ut enim ad minim veniam, quis nostrud exercitation ullamco laboris nisi ut aliquip ex ea commodo consequat. Duis aute irure dolor in reprehenderit in voluptate velit esse cillum dolore eu fugiat nulla pariatur. Excepteur sint occaecat cupidatat non proident, sunt in culpa qui officia deserunt mollit anim id est laborum.